
Why Choosing the Right DStv Dish Brackets Matters for Signal Strength and Long-Term Performance
The bracket used to mount your DStv satellite dish is just as important as the dish itself. Not only does the right mounting solution keep your dish securely positioned, but it also helps maintain strong signal reception throughout the year. Consequently, a properly installed bracket, including quality DStv dish brackets, can reduce signal interruptions, prevent dish movement during storms, and improve the overall performance of your DStv system.
Furthermore, different mounting options are designed for different property types and installation requirements. Whether you need a wall mount bracket, pole mount, roof mount, tripod stand, or L-bracket, selecting the correct option ensures maximum stability and optimal signal alignment. As a result, you can enjoy clearer picture quality, fewer signal problems, and a longer-lasting satellite installation with the right DStv dish brackets.
Therefore, understanding the advantages of each DStv dish mounting option will help you choose the most suitable solution for your home or business in Cape Town and surrounding areas. In the sections below, we explain the most common DStv dish brackets and when each should be used for the best results.
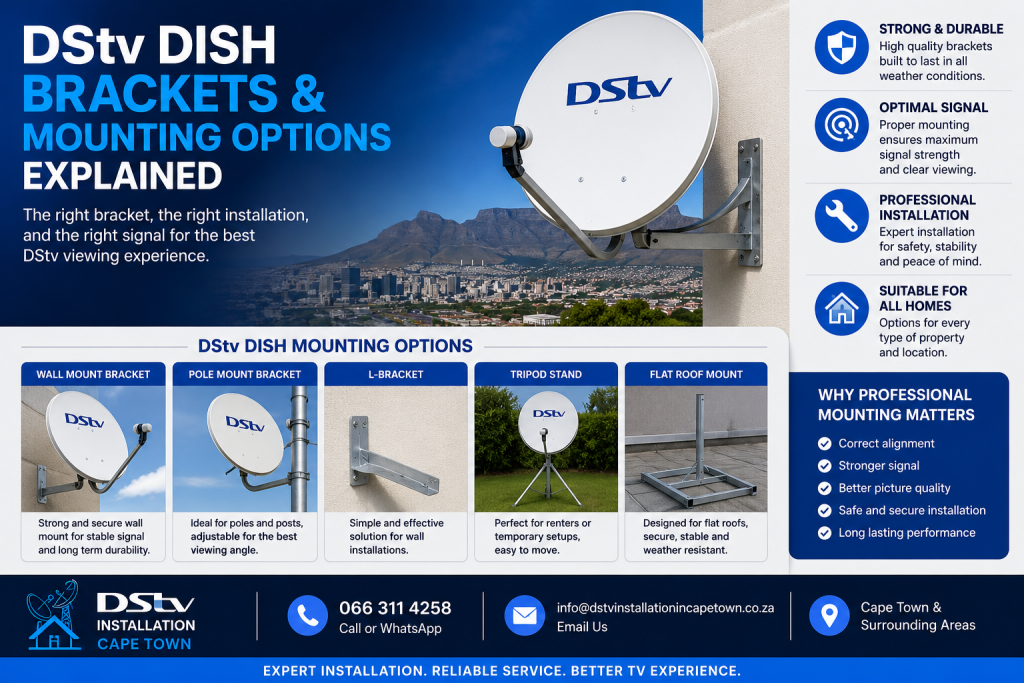
The bracket and mounting hardware that holds your DStv satellite dish is just as important as the dish itself. A weak or poorly installed bracket leads to dish movement in wind, signal loss, and repeated realignment visits. Here is a guide to DStv dish brackets and mounting options so you get it right the first time.
Types of DStv Dish Brackets
Wall Mount Bracket
The most common mounting type for residential installations. A steel arm bolts to an exterior brick or concrete wall, and the dish attaches to the arm.
- Price: R80–R200
- Best for: brick or concrete walls with clear line of sight to the satellite
- Pros: solid, low wind profile, least likely to move
- Cons: requires drilling into the wall; not suitable for face-brick where the owner does not want visible holes
Pole Mount (Free-Standing)
A steel pole concreted into the ground or bolted to a base plate. The dish sits on top of the pole.
- Price: R200–R400 (pole + base plate)
- Best for: garden or yard installations where wall mounting is not possible, or where the best signal direction faces away from the building
- Pros: flexible positioning, no wall drilling
- Cons: more exposed to wind movement; pole must be thick enough (40mm+) and properly anchored
Roof Mount
A bracket that attaches to the roof ridge, roof tiles, or roof sheeting. Used when wall mounting is impractical and ground space is limited.
- Price: R150–R350
- Best for: properties with obstructed wall positions or apartment buildings
- Pros: gets the dish above surrounding obstructions
- Cons: harder to access for maintenance, risk of roof leaks if not sealed properly
Balcony / Railing Mount
A clamp-style bracket that attaches to a balcony railing or parapet wall without drilling.
- Price: R100–R250
- Best for: apartments and complexes where drilling is restricted
- Pros: non-destructive, easy to remove
- Cons: less stable, only suitable for smaller dishes (80cm or less)
Choosing the Right Bracket
The right bracket depends on your property, the dish size, and wind exposure. Key considerations:
- Dish size — a 90cm dish has significantly more wind load than an 80cm. Use a heavier bracket and thicker fixings for larger dishes.
- Wind exposure — Cape Town is windy. If your mounting spot is exposed, use a wall mount or a heavy pole (50mm+) with a concrete base. Read: where to mount a DStv dish in Cape Town.
- Wall material — brick and concrete hold rawl bolts well. Dry wall, wood frame, and corrugated iron need different fixings or a pole mount instead.
- Body corporate rules — some complexes restrict dish mounting positions and sizes. Check before installing.
Common Bracket Mistakes
- Thin pole — a 25mm pole will flex in wind and cause signal drops. Use 40mm minimum, 50mm for exposed positions.
- Under-sized wall plugs — use M8 or M10 rawl bolts, not small plastic wall plugs. The dish acts as a sail in wind.
- Mounting to a wooden fence or garden wall — these structures flex. The dish needs a rigid mounting surface.
- Not enough clearance — the dish needs room to swivel for alignment adjustment. Mount the bracket with enough standoff from the wall.
Bracket Prices Summary (2026)
- Standard wall mount bracket — R80–R200
- Heavy-duty wall mount (for 120cm dish) — R200–R350
- Free-standing pole (1.5m, 50mm, with base) — R250–R450
- Roof ridge mount — R150–R350
- Balcony clamp mount — R100–R250
- Rawl bolts / fixings kit — R30–R60
Need a dish mounted properly? A professional DStv installer brings the right bracket for your property and ensures it is anchored to handle Cape Town wind. Professional installers follow ICASA broadcasting standards when mounting satellite equipment on residential buildings.
Need a DStv pro in Cape Town?
- DStv installers near me — certified local technicians across Cape Town
- DStv technician near me — book a skilled tech today
- DStv repairs near me — fast signal and decoder fixes
- DStv dish installation prices — 2026 Cape Town price guide
- DStv contact number Cape Town — local installer and repair line
More Cape Town DStv guides
- The Right Place to Mount Your DStv Dish for the Best Signal in Cape Town
- Why Does a DStv Dish Move Out of Alignment in Wind?
- How Often Should a DStv Dish Be Realigned or Serviced?
- DStv Dish Size: The Best Simple Guide for 2026 Signal
- How Much Does DStv Installation Cost in Cape Town? Your Complete 2026 Guide
- The Biggest DStv Installation Mistakes to Avoid
Final Thoughts on Choosing the Best DStv Dish Brackets and Mounting Options
Selecting the right DStv dish bracket and mounting option is essential for achieving reliable signal reception, long-term durability, and uninterrupted entertainment. While a high-quality satellite dish is important, a secure and professionally installed mounting system ensures that your dish remains properly aligned, even during Cape Town’s strong winds and challenging weather conditions. As a result, you can enjoy consistent picture quality, fewer signal interruptions, and reduced maintenance costs over time.
Furthermore, understanding the advantages of wall brackets, pole mounts, roof mounts, tripod stands, and other mounting solutions allows you to choose the most effective option for your specific property. Therefore, investing in the correct DStv mounting hardware today can help prevent costly repairs and signal problems in the future.
If you need professional advice, dish bracket installation, satellite dish mounting, signal repairs, or a complete DStv system setup, DStv Installation Cape Town is ready to assist. Contact our experienced team today on 066 311 4258 or email info@dstvinstallationincapetown.co.za for fast, reliable, and professional DStv services throughout Cape Town and surrounding areas.